I-Tip Hair Extensions vs Microlinks: Pros, Cons, Cost & Maintenance Compared explores the key differences between two popular hair extension methods. This guide compares I-Tip and Microlink extensions in terms of their benefits, drawbacks, cost, and maintenance requirements, helping you choose the best option for your hair needs.
Hair extensions have become a mainstream beauty trend, offering an easy way to achieve longer, fuller hair without waiting for natural growth. As styling techniques evolve, more people are seeking methods that provide seamless results without causing damage. Two popular techniques that have gained attention are I-Tip Hair Extensions and Microlink Hair Extensions. These two methods are both designed to add length and volume, but they differ in installation, maintenance, and overall impact on hair health.
I-Tip Hair Extensions involve small, individual strands of hair that are secured to your natural hair using a small metal bead or cylinder. The "I" shape refers to the tip of the extension that is inserted into the bead, making the method non-damaging, as it doesn't rely on heat or chemicals. This technique is best for those looking for a natural look and feel.
On the other hand, Microlink Hair Extensions also use beads to secure the extensions, but the application process differs slightly. The hair is pulled through a small ring, and the extension is clamped in place. This technique offers a similar result in terms of length and volume but is often preferred for its quicker application and versatility in adjusting to various hair textures.
This article aims to compare I-Tip Hair Extensions vs Microlinks: Pros, Cons, Cost & Maintenance Compared, giving you a comprehensive look at the advantages and disadvantages of each method. Whether you're considering hair extensions for the first time or are looking to switch up your current method, understanding the differences in cost, maintenance, and suitability for different hair types will help you make an informed decision. By exploring these factors, you’ll be better equipped to choose the best hair extension technique to meet your needs.
What Are I-Tip Hair Extensions?
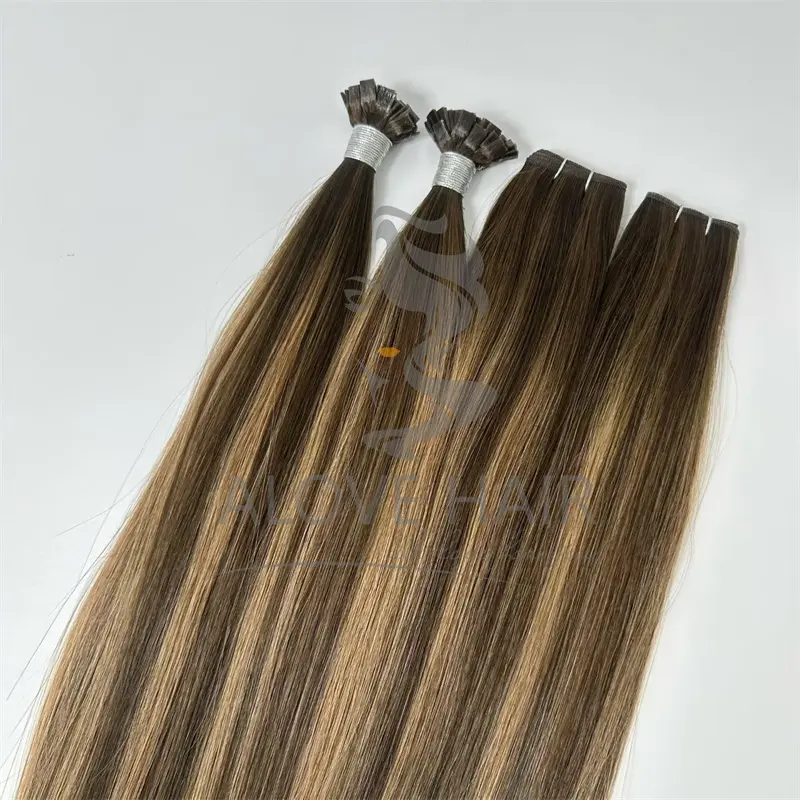
I-Tip Hair Extensions are a popular, non-permanent method of adding length and volume to natural hair. This extension technique involves individual strands of hair, which are securely attached to your natural hair using a small metal bead or cylinder. The "I" in I-Tip refers to the shape of the hair extension's tip, which is inserted into the bead before being clamped down. This method is highly favored for its natural look and damage-free approach, as it doesn’t involve heat or glue, which can harm natural hair.
The extensions used in I-Tip applications are made from high-quality human hair, which can be treated, styled, and colored just like natural hair. The extensions are small, individual pieces that blend seamlessly with your natural hair, giving you a voluminous and more natural look. The "I-Tip" name comes from the tiny, thin tips of the extension strands that are inserted into the bead during installation.
Installation Method: Tools and Process
Installing I-Tip Hair Extensions requires specialized tools and careful application. The process involves the following steps:
Preparation: The natural hair is sectioned into small, manageable parts, allowing the stylist to work one section at a time. This step is crucial for even distribution and blending of the extensions with your natural hair.
Insertion of Extensions: Using a small hook tool or needle, the stylist will pull a small section of your natural hair through a small metal bead. The "I-Tip" hair extension is then placed into the bead.
Securing with Bead: The stylist uses a set of specialized pliers to clamp the bead tightly around the natural hair and extension, securing the two together. This bond is firm yet gentle on the natural hair, preventing unnecessary breakage or damage.
Blending and Finishing: After the extensions are applied, the stylist will blend and style the hair to ensure the extensions mix naturally with your own hair. The process is repeated throughout the head, row by row, until the desired length and volume are achieved.
Unlike other extension methods that may require adhesives or glue, I-Tip extensions are highly versatile, allowing users to maintain their natural hair health while achieving a full, voluminous look. The installation process typically takes 2 to 4 hours, depending on the amount of hair being added.
Who Is Best Suited for I-Tip Hair Extensions?
I-Tip extensions are suitable for a wide variety of individuals, though certain hair types and lifestyle factors may make them an even better choice. Here's a breakdown of who might benefit most from I-Tip extensions:
People with Fine or Thinning Hair: I-Tip extensions are ideal for those with fine or thinning hair because the small, discreet beads don’t add excessive weight to the hair, reducing the risk of damage. The individual strands of extensions blend seamlessly with natural hair, giving the appearance of thicker, fuller locks without looking bulky or obvious.
Individuals Seeking a Natural Look: If you're looking for a natural, undetectable result, I-Tip extensions are a great option. The individual strands are lighter and more flexible than tape-in or clip-in extensions, allowing them to move and behave like natural hair.
People Who Want Long-Term Extensions Without Heat or Chemicals: Since I-Tip extensions do not require the use of heat or glue, they are an excellent choice for those who are concerned about heat damage or the long-term effects of adhesive-based extensions. This makes them a gentler alternative compared to other methods.
Those with Medium to Long Hair: While I-Tip extensions can be used on short hair, they are typically better suited for individuals with medium to long hair, as the extensions can blend more naturally with longer natural hair.
Active Lifestyles: If you lead an active lifestyle and prefer a secure, long-lasting hair extension method, I-Tip extensions are a good choice. They are durable and stay in place without needing constant adjustments. However, regular maintenance is required to ensure the beads remain securely in place.
I-Tip extensions are a fantastic choice for those looking to enhance their hair without compromising its health. The application is simple, the result is natural, and the extensions can last several months with proper care and maintenance.
What Are Microlink Hair Extensions?
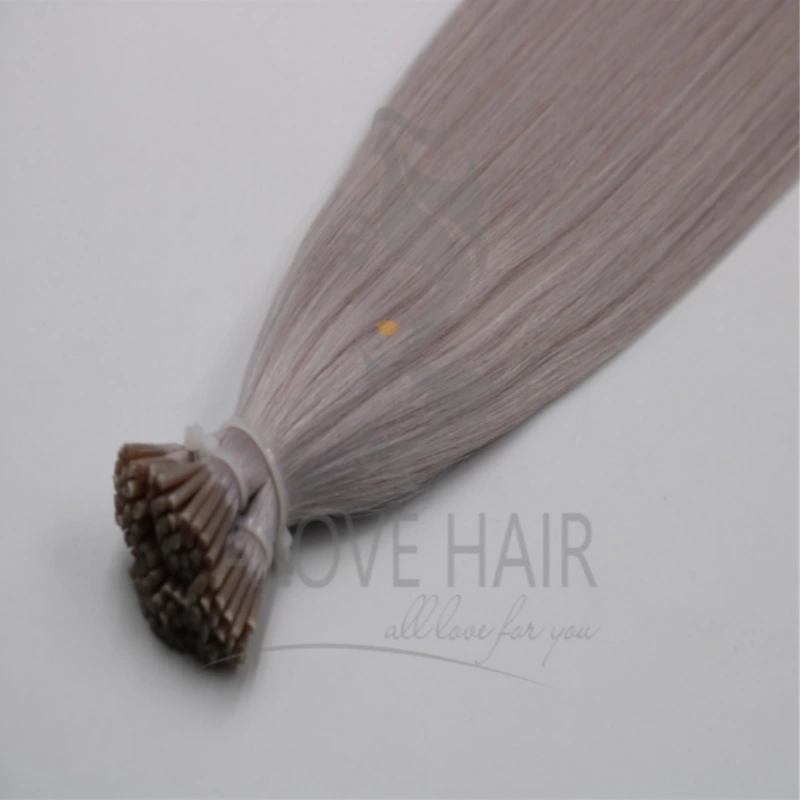
Microlink Hair Extensions are a popular method of adding length and volume to natural hair without the need for heat, glue, or tape. These extensions are attached using small metal beads or rings that secure individual strands of hair to the natural hair. The process involves threading a small section of natural hair through the bead, then attaching a microlink extension and clamping the bead tightly to hold everything in place. This technique is praised for its natural, seamless look and long-lasting results.
Microlink extensions are typically made from high-quality human hair, ensuring that they can be styled, colored, and treated just like natural hair. The individual strands of hair used for microlinks are smaller and more discreet compared to other methods, which helps create a smooth, natural blend with the natural hair.
Installation Method: Tools and Process
The installation of Microlink Hair Extensions involves a few simple steps and requires some specialized tools:
Sectioning the Hair: The natural hair is sectioned into small, manageable parts to make the process easier and more precise. This is important to ensure that the extensions are evenly distributed throughout the scalp.
Inserting the Beads: Using a special loop tool, a small section of natural hair is pulled through a small metal bead. The bead is typically very tiny, about the size of a grain of rice, allowing it to stay discreet and close to the scalp.
Attaching the Extensions: A microlink extension is then threaded into the bead along with the natural hair. Once the extension is in place, the stylist uses specialized pliers to clamp the bead tightly, securing the extension to the natural hair. The bead ensures the extension stays in place without slipping or shifting.
Blending and Styling: After the extensions are installed, the stylist will blend and style the hair to make sure the extensions mix naturally with the natural hair. This may include trimming and shaping the hair to ensure a seamless, cohesive look.
The process typically takes about 2 to 3 hours, depending on the amount of hair being added. It’s a great option for those who want a longer-lasting, more natural-looking hair extension solution.
Who Is Best Suited for Microlink Hair Extensions?
Microlink hair extensions are suitable for a variety of hair types and personal preferences. Here’s a breakdown of who might benefit most from this method:
People with Medium to Thick Hair: Microlinks work best on medium to thick hair, as the method requires a bit more hair volume to secure the beads properly. People with very fine or thin hair may still be able to use microlinks, but it’s essential to ensure that the extensions don’t put too much strain on the natural hair.
Individuals Seeking Versatility: Microlink extensions are highly versatile because they can be removed, adjusted, and reinstalled. This makes them a great option for people who may want to change their hair length, volume, or style over time.
Those Avoiding Heat or Glue: Microlink extensions are perfect for individuals who want to avoid the damaging effects of heat, chemicals, or adhesives. Since microlinks use beads to secure the extensions, they are a gentler alternative to methods like glue-in or tape-in extensions.
Active Lifestyles: If you lead an active lifestyle and are concerned about your extensions slipping or becoming loose, microlinks are a durable choice. Once the beads are clamped, they stay securely in place, even during physical activities. However, regular maintenance is required to ensure they stay intact.
People Seeking a Natural Look: For those who want a subtle, natural look, microlinks are ideal. The individual beads are small and discreet, so the extensions blend seamlessly with the natural hair, offering a more invisible result compared to bulkier extension methods.
Microlink Hair Extensions are an excellent choice for individuals looking for a long-term, natural-looking solution to enhance the length and volume of their hair without the need for glue, tape, or heat.
I-Tip vs Microlinks: Pros & Cons
When it comes to enhancing your natural hair with extensions, I-Tip and Microlink hair extensions are two of the most popular and non-damaging methods. Each technique offers its own unique benefits and some potential drawbacks, making it important to weigh the pros and cons before deciding which method is right for you. Below, we will compare the advantages and disadvantages of I-Tip Hair Extensions and Microlink Hair Extensions to help you make an informed choice.
A. I-Tip Hair Extensions
Pros:
No Heat or Chemicals Used – Less Damage:
One of the biggest advantages of I-Tip Hair Extensions is that they don’t require the use of heat, glue, or chemicals during the installation process. Unlike methods such as fusion or tape-in extensions, which may cause damage over time due to adhesives or heat application, I-Tip extensions rely on small metal beads to secure the hair. This makes the process gentler on your natural strands, reducing the risk of breakage and maintaining the health of your hair.
Reusable and Eco-Friendly:
I-Tip extensions can be reused multiple times, which is a major plus for both your wallet and the environment. Since the beads are simply clamped onto the natural hair, they can be removed and reinstalled without causing any harm to the extensions or your hair. This sustainability factor makes I-Tip extensions a great long-term investment, as they last much longer than some other extension methods.
Perfect for Fine or Thin Hair – Natural Appearance:
I-Tip extensions are especially suitable for those with fine or thin hair. The individual strands blend seamlessly with your natural hair, making them almost invisible. The lightness of the extensions ensures that they don’t add bulk, offering a very natural look. If you’re looking to add volume without sacrificing the authenticity of your hairstyle, I-Tip extensions are a great choice.
Cons:
Installation Process Takes Longer:
One downside of I-Tip extensions is that the installation process can be time-consuming. Depending on how much hair is being added, the process typically takes 2 to 4 hours to complete. This is longer than other methods like clip-ins or tape-ins, so it might not be ideal for someone who is looking for a quick solution.
Regular Adjustments May Be Necessary:
I-Tip extensions need to be adjusted every few weeks as the natural hair grows out. The beads that hold the extensions in place gradually move away from the scalp as hair growth occurs. This means that regular touch-ups or maintenance visits are required to ensure that the extensions stay secure and look natural. For those with a busy lifestyle, this might be a downside.
Not Ideal for Extremely Short or Damaged Hair:
I-Tip extensions are not recommended for individuals with very short or damaged hair. The small beads used to secure the extensions need enough natural hair to hold onto. If your hair is too short or weakened by damage, the beads may not be able to securely fasten the extensions, making the method less effective.
B. Microlink Hair Extensions
Pros:
Works for All Hair Types, Especially Thick Hair:
One of the most significant advantages of Microlink Hair Extensions is their versatility in accommodating all hair types. They work particularly well for those with thick or coarse hair, as the method can hold up well against the weight of thicker hair textures. Whether you have straight, wavy, or curly hair, microlinks can be customized to fit your needs. For people with naturally thicker hair, microlinks provide a secure and lasting solution.
Faster Installation Time:
Compared to I-Tip extensions, the installation process for Microlink Hair Extensions is typically faster. Microlinks require less time to install because the beads are slightly larger, and the application process is streamlined. The method typically takes 1 to 2 hours, making it a faster choice for those looking for quicker results. This makes it ideal for people who need extensions but are pressed for time.
No Heat Tools or Chemicals Required:
Like I-Tip extensions, Microlink Hair Extensions do not rely on any heat or chemicals for installation. The extensions are secured using small beads, so they are considered a safer alternative to methods that require heat fusion or adhesive. This makes microlinks a gentle and non-damaging option for anyone looking to enhance their hair without compromising its health.
Cons:
Regular Maintenance is Required:
While Microlink Extensions are known for being durable, they still require regular maintenance. As with any extension method, the beads may loosen over time as natural hair grows out. This means the beads need to be tightened, and adjustments may be necessary every 6 to 8 weeks. For people who want a low-maintenance option, this could be a disadvantage.
Metal Beads May Cause Discomfort:
The small metal beads used to secure the extensions may cause some discomfort, particularly in the early days after installation. As the beads sit close to the scalp, some people might experience mild irritation or tightness. Though this sensation usually subsides after a few days, those with sensitive scalps might find the initial discomfort uncomfortable.
Long-Term Use May Cause Hair Breakage:
Over time, the constant pressure exerted by the metal beads on the natural hair can lead to hair breakage, especially if the beads are too tight or improperly maintained. For individuals with fine or weak hair, this could be a concern. It's important to ensure that the beads are properly fitted and that regular adjustments are made to avoid any damage.
Both I-Tip Hair Extensions and Microlink Hair Extensions offer unique benefits and some potential drawbacks, depending on your hair type, lifestyle, and preferences.
If you're looking for a natural look, less damage, and long-term sustainability, I-Tip extensions might be the ideal choice, particularly for those with fine or thin hair. However, the process takes longer and may require more frequent maintenance.
On the other hand, Microlinks provide faster application, work well for thicker hair, and also avoid heat or chemicals. They might require regular maintenance and could cause discomfort due to the metal beads, but they are a great option for those seeking a quicker and versatile extension method.
Ultimately, the best choice depends on your hair type, how much time you can dedicate to maintenance, and your desired outcome.
Cost Comparison: I-Tip vs Microlinks
When considering hair extensions, the cost is an essential factor. Both I-Tip and Microlink extensions come with their initial installation costs, along with long-term maintenance expenses. Understanding these costs will help you make an informed decision based on your budget and the longevity of the extensions. Let’s break down the pricing for both methods.
I-Tip Hair Extensions Costs
Initial Costs: Materials and Installation Fee
The initial cost of I-Tip extensions includes both the price of the extensions themselves and the installation fee.
Extension Costs:
The price of I-Tip hair extensions typically ranges from $200 to $500 or more, depending on the length, quality, and volume of the extensions. High-quality 100% human hair extensions, which are more durable and blend naturally with your natural hair, will generally cost on the higher end. The longer and thicker the hair, the more expensive the extensions will be.
Installation Fees:
The installation of I-Tip extensions requires a skilled stylist to apply each individual strand of hair to your natural hair using metal beads. This process can take 2 to 4 hours, and installation fees generally range from $150 to $400 depending on the stylist's experience, location, and the amount of hair being applied. The process is labor-intensive, which can lead to higher installation costs.
Regular Maintenance Costs
Although I-Tip extensions don’t require much upkeep, they do need to be maintained every 6 to 8 weeks to keep them looking fresh. Maintenance involves repositioning the beads as your natural hair grows, which may require removing and reinstalling the extensions.
The maintenance fee can range from $100 to $250 depending on how much hair needs to be moved and the stylist's rates.
Since I-Tip extensions are reusable, this maintenance cost is much lower than the initial installation fee.
Microlink Hair Extensions Costs
Initial Costs: Price and Installation Fee
The initial cost for Microlink extensions includes both the price of the hair and the installation service.
Extension Costs:
Microlink extensions are generally priced similarly to I-Tip extensions, with high-quality human hair extensions costing between $200 to $500 or more, depending on the length, thickness, and quality of the hair. Because Microlinks use individual strands of hair like I-Tip extensions, the cost can vary based on the volume and desired look.
Installation Fees:
The installation of Microlink extensions typically takes 1 to 2 hours, making it a quicker process than I-Tip extensions. Installation fees are generally in the range of $150 to $300, depending on the stylist and how much hair is being added.
While Microlinks may have slightly lower installation fees due to the faster application time, the difference in cost is not vast when compared to I-Tip extensions.
Regular Adjustment Costs
Like I-Tip extensions, Microlinks need regular adjustments as your natural hair grows. This typically involves tightening the beads to keep the extensions secure and repositioning them.
The adjustment cost for Microlinks is usually $100 to $200 per session.
Since the extensions need to be adjusted every 6 to 8 weeks, the long-term cost for Microlinks is similar to I-Tip extensions in terms of maintenance.
Long-Term Costs: Comparing I-Tip vs Microlinks
The long-term costs for both I-Tip and Microlink extensions are influenced by the reusability of the extensions, the maintenance schedule, and the type of hair used. Both methods offer reusable hair, which reduces the need to purchase new extensions for each maintenance session. However, both still require regular upkeep, such as repositioning beads and ensuring the extensions stay in place.
I-Tip Hair Extensions Long-Term Costs:
Estimated Long-Term Cost (over 12 months):
Extensions: $200 - $500
Maintenance: $100 - $250 every 6-8 weeks (3-6 maintenance sessions in a year)
Total Estimated Yearly Cost: $500 - $1,500
Initial Installation: $200 - $500 (depending on hair quality and length)
Maintenance: $100 - $250 every 6-8 weeks
Reusability: Since I-Tip extensions can last 6-12 months or longer, depending on how well they are maintained, you can continue to use the same hair during this period. This makes I-Tip extensions more cost-effective over time compared to methods that require frequent replacement.
Microlink Hair Extensions Long-Term Costs:
Estimated Long-Term Cost (over 12 months):
Extensions: $200 - $500
Maintenance: $100 - $200 every 6-8 weeks (3-6 maintenance sessions in a year)
Total Estimated Yearly Cost: $500 - $1,500
Initial Installation: $200 - $500
Maintenance: $100 - $200 every 6-8 weeks
Reusability: Like I-Tip extensions, Microlink hair extensions can last anywhere from 6 months to a year, depending on how well they are cared for. Reusing the same hair helps lower costs, but the beads may need to be replaced if they become loose or damaged.
Both I-Tip and Microlink hair extensions come with similar initial costs and long-term maintenance expenses. The primary differences lie in the installation process and the duration between maintenance visits.
I-Tip extensions may be a bit more costly due to the longer installation time, but they can last longer, making them a good investment for those looking for a more sustainable option.
Microlink extensions, on the other hand, are typically quicker to install and may be more suitable for people with thicker hair, though they require similar maintenance and adjustment costs.
The long-term cost for both methods will depend on the quality of the hair, how often you maintain them, and the maintenance required to keep your extensions looking fresh. Both offer a range of costs that can be tailored to fit your budget and desired look.
Maintenance: How to Care for I-Tip and Microlink Extensions
Proper care and maintenance are crucial for keeping I-Tip and Microlink extensions looking fresh and long-lasting. Both methods require specific attention to ensure the extensions remain secure, healthy, and blend seamlessly with natural hair. Below, we’ll discuss how to properly care for each type of extension, including essential maintenance tips.
A. Maintenance for I-Tip Extensions
1. Hair Care and Washing Tips
Proper washing and conditioning techniques are essential for maintaining I-Tip extensions. Here's how to care for your hair when wearing I-Tip extensions:
Gentle Shampooing: Use a sulfate-free shampoo to avoid stripping the hair of its natural oils. When washing, focus on cleaning your scalp rather than scrubbing the extensions directly. This helps prevent tangling and ensures the extensions stay in place.
Conditioning: Apply conditioner to the ends of your hair, avoiding the beads where the extensions are attached. Heavy conditioners or oils near the bead area can cause slippage or loosen the extensions.
Drying: After washing, pat your hair dry with a towel and avoid rubbing the extensions. Let the hair air-dry or use a blow dryer on a low heat setting. Avoid using high heat on the extension beads as it can cause them to weaken or loosen.
Combing: Always use a wide-tooth comb or a brush with soft bristles to detangle the hair, starting from the ends and working your way up. This helps prevent unnecessary pressure on the extensions and reduces the risk of breakage.
2. Tips for Maintaining I-Tip Extension Stability
To ensure the stability of your I-Tip extensions, follow these tips:
Avoid Excessive Heat: I-Tip extensions can withstand heat styling, but it’s essential to avoid using high-heat tools directly on the beads or roots of your hair. Always apply a heat protectant before using any styling tools to reduce the risk of damage.
Sleeping Care: Tie your hair loosely in a braid or ponytail before bed to prevent tangling or breakage. You may also consider using a silk or satin pillowcase to reduce friction and protect both your natural hair and extensions.
Be Gentle with Hair: When brushing or styling, be gentle near the roots where the beads are attached. Pulling or tugging at the beads can cause them to loosen or the natural hair to break.
3. Regular Checks and Adjustments
I-Tip extensions require regular checks to ensure they remain secure and properly positioned. As your natural hair grows, the beads may gradually shift away from the scalp. It's important to have your stylist check your extensions every 6-8 weeks to ensure they are not too loose. They may need to be repositioned or adjusted to prevent any slippage or discomfort.
Regular adjustments and maintenance appointments are key to keeping your extensions looking their best and maintaining their longevity.
B. Maintenance for Microlink Extensions
1. Avoiding Bead Slippage or Damage
One of the primary concerns with Microlink extensions is ensuring that the metal beads remain secure and do not cause discomfort. To prevent slippage or damage:
Avoid Over-tightening: While it's important that the beads are clamped tightly enough to secure the extensions, over-tightening can cause discomfort and even damage to your natural hair. Make sure the beads are snug, but not too tight.
Avoid Excessive Pulling: Just like with I-Tip extensions, avoid pulling or tugging on the hair, as this can loosen the beads or cause them to shift. Be mindful when brushing or styling your hair, and always be gentle near the bead area.
Use the Right Products: Certain hair products like oils or serums can cause the beads to slip if applied near the roots. Use lightweight products that don’t build up at the scalp and avoid applying heavy products directly to the bead area.
2. Cleaning and Hair Care Recommendations
Caring for your natural hair and extensions is essential for longevity:
Gentle Shampooing: Use a sulfate-free shampoo to cleanse both your natural hair and extensions. Make sure to focus on the scalp and roots where the beads are attached, but avoid massaging or rubbing the bead area directly, as it could weaken or loosen the beads.
Conditioning: Apply conditioner to the mid-lengths and ends of your hair, avoiding the bead area to prevent product buildup. You can also use a leave-in conditioner to maintain moisture and shine. Be careful not to use too much conditioner, as it may weigh down the extensions or cause slipping.
Drying: After washing, gently towel-dry your hair. Use a blow dryer on a low heat setting to dry your hair, or allow it to air dry. Avoid applying excessive heat directly to the beads, as it may weaken them over time.
Brushing: Detangle your hair using a wide-tooth comb or a brush designed for extensions. Start at the ends and work your way upward, being cautious around the bead area to prevent damage.
3. Regular Maintenance Frequency
Like I-Tip extensions, Microlink extensions require regular maintenance to keep them looking their best.
It’s recommended that you visit your stylist every 6-8 weeks for a maintenance appointment. This will allow the stylist to check the beads, adjust any loose extensions, and ensure that the natural hair is not experiencing any breakage or stress.
During maintenance, the beads will often need to be adjusted or tightened as your natural hair grows. This is a routine part of keeping the extensions secure and ensuring that they remain comfortable.
Proper care and maintenance are essential for the longevity and comfort of both I-Tip and Microlink extensions. Here are the key takeaways:
I-Tip extensions require gentle hair care techniques, especially when washing, conditioning, and detangling. Regular adjustments are necessary every 6-8 weeks to maintain the integrity of the beads.
Microlink extensions require careful attention to avoid bead slippage and product buildup. Regular visits every 6-8 weeks will help ensure that the beads are secure and the extensions stay comfortable.
By following these maintenance tips and scheduling regular check-ups with your stylist, you can enjoy long-lasting, beautiful extensions that keep your hair looking flawless.
Which One is Right for You?
When deciding between I-Tip and Microlink hair extensions, it’s important to consider your specific needs, hair type, and the results you're hoping to achieve. Below is a breakdown of which type of extension is best suited for different individuals based on their preferences and lifestyle.
I-Tip Hair Extensions: Best for Those Who Want a Natural Look and Long-Lasting Results
I-Tip extensions are ideal for individuals who are looking to enhance their natural hair with a more subtle and seamless look. This method is especially suitable for:
People with Fine or Thin Hair: I-Tip extensions blend well with finer hair textures, as the individual strands are lightweight and can add volume without looking bulky. The result is a natural, fuller appearance that doesn’t weigh down the hair.
Those Seeking a Natural Look: If you prefer extensions that blend seamlessly into your natural hair without being too noticeable, I-Tip extensions are the way to go. The beads are discreet, and the application process results in a very natural finish.
Those Who Don’t Mind Regular Maintenance: I-Tip extensions require regular adjustments every 6-8 weeks to keep them in place as your natural hair grows. If you don’t mind committing to regular salon visits, this method can provide long-term, stunning results.
People Looking for Long-Lasting Extensions: I-Tip extensions are known for their durability. They can be reused and last up to 12 months with proper care, making them a good investment for those who want long-term extensions.
Microlink Hair Extensions: Ideal for Those Seeking a Quicker Solution and Less Frequent Maintenance
Microlink extensions are perfect for individuals who are looking for a faster application process and those who prefer a little less upkeep in terms of maintenance. This method works well for:
People with Thicker Hair: Microlinks are versatile and work well with all hair types, especially thicker or coarser hair. The beads are strong enough to hold up against heavier textures, and they blend easily.
Those Seeking Quick Length: If you want to add length quickly without the longer installation process, Microlink extensions are a great choice. The installation is faster than I-Tip, typically taking only 1 to 2 hours.
Those Who Prefer Less Frequent Maintenance: Microlink extensions may require maintenance every 6-8 weeks, but the installation process tends to be quicker, so you won't need to spend as much time in the salon. If you want a low-maintenance option that still delivers beautiful results, Microlinks are a good fit.
People Seeking Versatility: Microlinks offer more flexibility when it comes to styling, and they can be a better option for those who like to experiment with different looks while maintaining a natural feel.
The choice between I-Tip and Microlink extensions comes down to your specific goals and lifestyle:
Choose I-Tip extensions if you want a more natural, seamless look with long-lasting results, and if you’re willing to commit to regular salon visits for maintenance.
Opt for Microlink extensions if you’re looking for a quicker, less frequent maintenance solution that works well for thicker hair and offers versatile styling options.
By considering your hair type, maintenance preferences, and desired look, you can determine which extension method will best suit your needs.
Conclusion
Both I-Tip and Microlink extensions offer distinct advantages and are ideal for different types of individuals.
I-Tip extensions are known for their natural, seamless look and are perfect for individuals with fine or thin hair. They are durable and reusable, providing a long-term solution, but require regular maintenance every 6-8 weeks. The process of installing I-Tip extensions can take longer, and while they are environmentally friendly, they may require a higher initial investment.
On the other hand, Microlink extensions are faster to install, making them suitable for people looking for quick length and volume. They are versatile and can be used on all hair types, especially thicker hair. However, they require periodic maintenance to ensure the beads stay in place. The installation process is shorter than I-Tip, and the cost of maintenance is similar.
Choosing the Right Option
Budget: If you're on a tight budget, Microlinks may be a more affordable option due to their quicker installation time, while I-Tips may have a higher initial cost but are a longer-term investment.
Hair Type & Desired Look: Consider your natural hair texture and the kind of result you want. I-Tip extensions offer a more natural, long-lasting appearance, while Microlinks offer quick length and volume.
Maintenance Time: If you have limited time for regular maintenance, Microlinks may be a better fit due to the less frequent adjustments.
Ultimately, your choice will depend on your personal needs, budget, and hair goals.
906.webp)